Tuesday, April 17, 2012
Selman's Reflection
The
overall lesson I learned from ME250 was that what you create in the ideal world
of SolidWorks could not be replicated into the real world without some error.
With that said, we assumed that the design and manufacturing process would take
up most of our time but in fact, the assembly process was the most time
consuming. Indeed, it took roughly 20 minutes to put the car together; however,
we would have to do this multiple times since we would encounter a new problem
each time and would need to accommodate for it. Unfortunately, fixing one
problem would open a Pandora’s box of other problems and given our severe time
constraints, we were extremely stressed out but our only option was to continue
to plow onwards. Nevertheless, back to the initial stages of the process, the
design process was by far the most critical to influencing the manufacturing
and assembling processes. For instance, we started to machine before SolidWorks
was finalized since we felt that we needed to start immediately. However,
looking back now, we definitely should have waited until we completed the
entire file since we could not easily apply changes to the design after having
parts already machined. Furthermore, once we were well into the manufacturing
process, I learned that patience is key the hard and painful way: having to
accommodate for the accumulating errors by revisiting already machined parts
and wasting valuable time. In addition, in the real world, parts are not the
exact dimensions they say they are, which led to wasting even more time by
having to ream, sand or mill parts we thought were finalized. Since there was a
lack of time, we realized quickly that organization and team management would
decide whether or not we would be able to complete the machine. Using our
CTools page, we made weekly (and as we got closer to the end, daily) lists of
things that needed to be done, which saved us substantial time and allowed us
to use our machine shop time more effectively. Once again, the reoccurring
theme of patience comes into play again because teams are diverse in nature and
need time to mesh, and ours was no exception. We definitely had different kinds
of members in the group (director, 2 analyzers and a supporter) and needed to
meet outside of class time to discuss the next step forward before going into
the shop. Once we were on the same page, the most stressful days towards the
end happened to be the most efficient. On a different note, the course was well
designed; however, what had us struggling the most was bridging the design
process to the manufacturing process. To be honest, I did not really understand
the lathe’s and mill’s full capabilities for nearly two weeks in the shop. One
way of fixing this would be to expose students to the shop earlier so that they
can understand what is the most reasonable way to design the car such that the
manufacturing process would be simplified. For instance, we maximized our
dimensions without realizing that it was a hassle to drill screw holes in the
sides of a 12” by 13” acrylic plate. Of course we happened to learn that the
hard way. In the end, it seems that learning something the hard way is a great
method of permanently remembering what not to do for the next project.
Monday, April 16, 2012
Reflection - Carlea Hazzard
So, our team Balls of Fury and our little car certainly gave us trouble in the end. We had a slow start with the design and deciding our strategy, but we finally got rolling on building the project about a week after the exam. That week was hell week for all of us with midterms. It would've been nice to start building early but we did what we could. I felt more comfortable working on the lathe, but eventually I think we all had a chance to get better on all the machines. Selman did alot of tedious work on the CAD model :( . But we started manufacturing and unfortunately had to remake a few parts due to the holes not lining up correctly. We also started to worry about materials we were supposed to be using, and the length of car was becoming an issue and beginning to interfere with our waterwheel design. However in the end, a little rushed, we worked out the kinks and eventually got to the point of assembling the car, which took a heck of a lot longer then we would've wanted. We had a few moments of improvising with connecting parts and having to drill new holes or make new pieces. Unfortunately the acrylic ended up getting a few cracks in it. And the shafts we realized a little late needed to be sanded down to fit in the ball bear holes which turned out to be a major problem of why our machine wasn't running well during the seeding rounds. The motors gave us some problems with being difficult to put together and always falling apart at the wrong time. The competition went surprising well/ lucky for what I was expecting. A tie. A tie. A forfeit. Then getting our butts kicked by Aquatone, but also doing our personal best. Unfortunately our strategy with the fence was not able to deploy because we were having trouble with the motor and gear being able to roll it out on competition day. But, 'IN THEORY' it was a good a idea. But, looking back there are certainly things that needed to be changed to use our strategy/design to make it better. However, it ended up working better than expected. Had a problem with turning because the car was at maximum dimensions. But, being so big, also worked in our advantage sometimes by blocking our opponents team strategy. Overall, in the end and lots of rush building that last week the car turned out pretty good. :)
Final Machine & Bill of Materials
 |
| the evolution of our machine: February, March, April |
The machine is built on our original concept: a 4-wheeled vehicle with a 'waterwheel' device in front to continuously move balls under the car and a 'fence' assembly in the rear to extend and guide the balls to the goal. Our original strategy was to sit by the tower and chug away with the waterwheel, sending a large number of bars straight back to our goal, so that we spend a minimum amount of time moving and a maximum amount of time scoring. We were going for error-forgiving efficiency.
When we knew how we wanted our car to look and function, we thought a lot about what material to use for each part. We went for sturdiness and ease of manufacturing.
We used a rack and pinion for the fence because we wanted a lot of torque and we needed precision so that the fence would come out straight.
To reduce unnecessary friction, we invested in extra ball bearings, using them in each wheel and the waterwheel.
The simple 'waterwheel' is made of colored craft foam hot-glued onto a long axle. The foam is a very good material to grab and bend with ping-pong balls. After considering different numbers and shapes of spokes, its cross-section was carefully designed with two tightly curved sections to maximize space and to push on the balls below their center of gravity. To be as forgiving as possible, the transmission for the waterwheel is just a couple rubber bands.
Our finalized bill of materials details every item we used to make our machine, especially trades and extra materials that we purchased.
In the end, however, our 'fence' module was operational, but not smoothly so. In competition, we moved around more and herded balls without the fence extending, getting in our opponent's way when convenient. Additionally, one of the set screw holes that connected a wheel axle to a motor stripped out shortly before seeding, and is currently replaced with epoxy and electrical tape. Yes, that fix actually worked! Despite this and its size and weight, our machine was surprisingly mobile, thanks to well thought out gear-ratios.
Sunday, April 15, 2012
Personal Reflection - Dan Suchyta
As a whole ME250 has taught me a lot and I have thoroughly enjoyed the class. Before I would have had absolutely no idea how to start machining anything, but now I feel like I understand the design process much better and have become a pro on the mill and lathe. I have had previous experience with CATIA as far as designing goes, but I learned a lot of cool tricks on Solidworks and now know how to assemble parts together, which was something I never learned how to do in CATIA. Never before have I done calculations and design something before making it. Usually I've just jumped right into building because no parts needed to be machined, they were just there and only assembly was required. But now I suppose those days of Legos and such are over and more design and thought needs to be put in before assembling which was a big lesson I learned from taking ME250. There were a couple times during the machining process that drawing were messed up or dimensions were not correct and as result a lot of time was wasted machining those parts, time which could have been better spent assembling and testing the robot and perfecting it as opposed to assembling it days before the ball tower competition. I never realized how important design and drawings were until this moment, but ever since I have been very careful to make the drawings precise as well as the calculations used to make the drawings. On another note, another thing I took for granted was how precise parts had to be. One should never assume that 1/4'' bearings and 1/4'' shafts are going to fit perfectly together because they are never machined or made into exactly the dimension they are advertised. I never would have thought that 1/1000 of an inch would make that big of a difference, but as we found with our drive train it made a huge difference as big as keeping the shaft from turning altogether. But once the shafts were sanded down and the bushings were reamed the shaft spun much better than before. All of these things i have mentioned I will definitely keep in mind when taking ME350, and just machining in general for future jobs. This is why I am very appreciative of what ME250 has to offer, real world experience as a class. It teaches you how to take what we learn in what I will call "textbook classes" and use it to designs and manufacture something just like one would in a business in the work world. Lectures for ME250 were also a very interesting part of the course. I definitely enjoyed learning how a drive train works and differentials as well. Learning about the different components of a drive trains works from the motor to the gears, to other implements turned out to be very beneficial when building our robot and calculating how fast we wanted our robot to move as opposed to how much power through torque we wanted our machine to have. Also, how to appropriately make drawings was a beneficial part to the class as it is something i will be able to take with me to a job in design or use should I decide to take a job in manufacturing instead. We learned about how different products are machined and produced in lectures to which I also found beneficial, because the design process of our machine was a lot less complicated than machines that make moldings or devices used in rapid manufacturing. I feel that learning about these processes now was very helpful in figuring out what to expect when mass producing something. From brainstorming ideas, to making a design to carry out our strategy, to building the physical model itself, I enjoyed ever part of ME250 and I can't wait to work on something even more interested and maybe even more complicated in ME350 next year.
Thursday, April 12, 2012
Design Expo
The competition at the design expo was pretty exciting! And we're pretty happy with how we did.
We tied our first match, against 'The Molemen,' with one ping pong ball each. They were seeded 15 spots above us, but, with its massive bulk, our machine really got in their way. Click here for the video. Both teams moved on.
Our opponent in our second match was 'Your Ad Here.' This time, our machine wasn't very mobile, having a hard time with one of its wheels, and it kind of got in its own way, but our opponent's car seemed to stop working partway through. You can see in the video how our car rolls easily in and out of the holes.
It's hard to keep track of everything in the video of our last match. Our machine had its best performance yet, scoring a number of ping-pong balls, even after it actually loses a wheel by the tower! We didn't even notice for most of the match. However, we were no match for the impressive number 1 seed 'Aquatone,' which scored a number of much heavier squash balls.

Can you see Balls of Fury there in the top 8?
 |
| inches from "WINNER!" |
So we're pretty happy. Just look at Selman's face:
(^Very funny Ester)
(^how can you spell my name wrong - it's right there)
 |
| left to right: Connor (our GSI), Dan, Carlea, Esther, Selman |
Wednesday, April 11, 2012


End. In. Sight.

Ms. Fury is looking pretty today. It's the morning of the final inspection and seeding for the competition.

We completed the final finishing touches last night. In particular, you might notice the lovely paint job: hot-rod style flames and a lovely fiery team logo.

The fence was 0.05" too wide to fit into the car. Since some of the screw heads broke off, we needed to bandsaw the fence into 4 components, end mill the edges, and then drill and tap new holes to keep it together. We also applied some finishing touches with the file.
The modules and motors seem to all be in order. We are a little worried about a few things, but, whatever happens, this project will be done very soon, and it really is amazing to see what was so recently just a design on a computer actually realized. By us.
Wednesday, April 4, 2012
Well that was a fail.
We were supposed to have 90% of our robot complete today. It didn't go so well.
We were really rushing to get it all together, and it seemed close ... but then the top axles just wouldn't go into place. Extremely frustrated, we couldn't figure out what had gone wrong.
After class, we tried to troubleshoot the problem. The model at first looks fine:

But on closer inspection, you can see that the bottom of the L-blocks, and even some of the bottom of the double motor, lie inside the acrylic body, which is clearly contradictory.

This must have happened when we realized we had the wrong gear size. When we changed the gears, Solidworks moved the shafts and motor down, given the mates already made. The transparent acrylic helped to hide the problem and none of us saw the problem until we assembled the machine.
We've decided to mill an indented area into the acrylic body for the motor to rest a little lower and to mill the bottom of the angle supports. So we are definitely behind. However, we are making a list of things we need to complete, and, even though there isn't much time, we are going to proceed carefully. It would be easy to rush everything and thus overlook things or make dreadful mistakes, as well as grow impatient with each other, but this would hurt us more than spending more time being methodical.
Thursday, March 29, 2012
Weekly Update
We are putting in a lot of hours in the machine shop, and the car is coming together - slowly, but coming together. We've had to redo a couple parts, and we can only get so much mill time.

Seriously, the shop feels like my new home and I keep finding bits of aluminum in my hairline or on my face or in my shoes. I think we all rather like machining, but it sure is tiring.
Here's a picture of my new design for the 'waterwheel' module that I'm going to build with craft foam outside of shop hours:

Thursday, March 22, 2012
In the Shop
Building is under way!
We are starting to get the hang of the laser cutter, band saw, and mill.
We are working on the parts to complete the most critical module of our car. When they're done and put together, they will look like this updated design:
Balls of Fury is so excited to be moving on from the design phase and to be making, what feels like, more tangible progress!
We are starting to get the hang of the laser cutter, band saw, and mill.
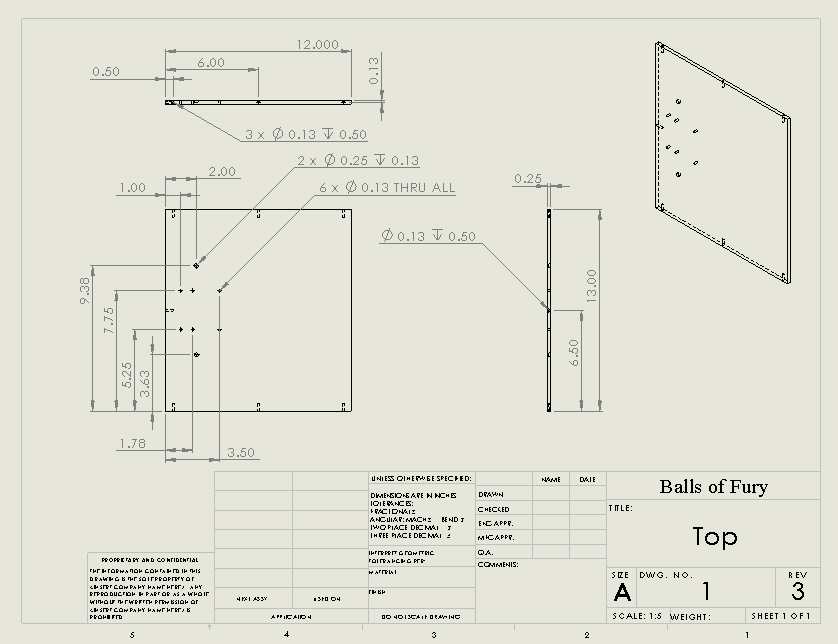 |
| drawing of the acrylic top plate |
 | ||||
| preparing the drawing for the laser cutter |
We are working on the parts to complete the most critical module of our car. When they're done and put together, they will look like this updated design:
 |
| Selman's very attractive model |
Balls of Fury is so excited to be moving on from the design phase and to be making, what feels like, more tangible progress!
Sunday, March 11, 2012
Manufacturing Plan & Bill of Materials
Click here for our spreadsheet of plans for materials and manufacturing.
Monday, March 5, 2012
Strategy & Machine Concept
We settled on a strategy that focuses on collecting balls from the base of the tower. We wanted to do this with a machine that can mostly just position itself in front of the tower and then sweep many balls under it continuously, guiding them to the goal without moving.
 |
| steps of our strategy |
Our final concept does this with a sort of "waterwheel" device on the front, and a fence that extends from the back with a rack and pinion mechanism.
 |
| final hand sketch of our design |
 |
| our styrofoam sketch model |
We created a Solidworks model that shows clearly how the modules of the machine will work together and how the motors and power transmission methods will function.

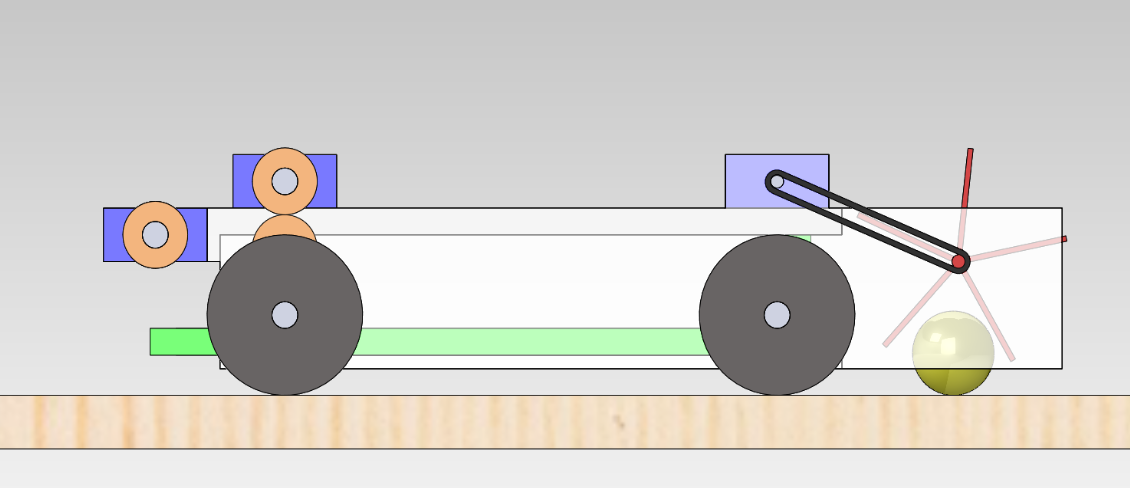 |
| Solidworks side view emphasizing how the machine interacts with ping pong balls |
We are very enthusiastic about this design and look forward to building it.
Subscribe to:
Posts (Atom)